


DIY Plarn Tutorial

Here’s a fun activity inspired by our recycled and alternatives yarn article! Easy enough for kiddos and crafting novices, this is a forgiving project with minimal materials and loads of potential.
Gather up those plastic bags that seem to multiply when you aren’t looking and a pair of scissors. That’s all you’ll need to create some plastic yarn - aka plarn! Use plarn like you would any other yarn in knitting or crochet projects or use it to create weavings. Experiment with different colors and thicknesses to create even more texture and visual appeal.
Step 1: Prep the bag.
Flatten the bag and remove bottom seam and handles.


Step 2: Refold and trim.
Open the bag and refold it so that the two remaining seams are together, one about an inch higher than the other. If the sides aren’t even, give them a little trim to create a nice rectangle, but don’t stress over perfect lines!


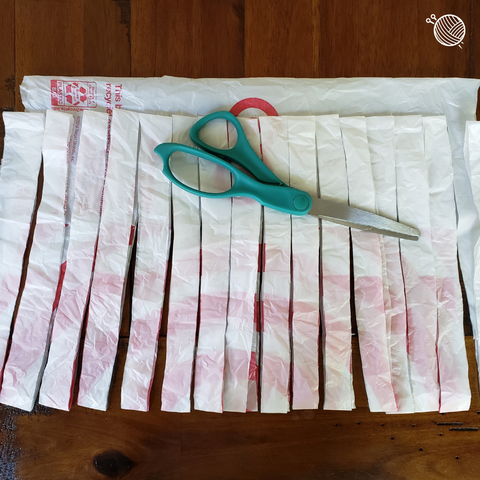
Step 3: Cut strips.
Starting at the fold and working toward the two seams, cut strips of ½-1” up through the first seam. Continue the length of the bag.

Step 4: Free the plarn.
Open the bag so the remaining seam can be laid flat. Cut on an angle from one strip on the right to the next on the left. Continue up the seam until all strips have been free, creating one long section of plarn!


Step 5: Get creative.
Wind your plarn and start your next crafting adventure that will be truly handmade!


*For reference, using one Target shopping bag, with approximately ¾” strips yielded more than 16 yards of plarn! The swatch above tested stockinette, garter and seed stitch on US 7 (4.5mm) needles.
Tips for Working with Plarn
- If you happen to make a cutting error, don’t toss it out! You can always join strips of plarn as you would normal yarn!
- We recommend joining new strands of plarn on the end of a row.
- Wind your plarn into a ball or around a piece of cardboard to keep it from getting tangled.
- Mix your plarn in with yarns to stretch materials and add interest!
- Watch your tension. Too much tension can stretch the plastic to a very thin strand, if not to the point of breaking. Too little tension will prevent any sort of stitch definition.
- Bonus: You can use this same method with old t-shirts to create another yarn alternative!
If you’re looking for more plarn tutorials or if you’re a video learner, The Kitchen Table Classroom and The Spruce Crafts have helpful plarn pages.
We would love to know if you give this a try! Share your thoughts below and send or tag us in photos!
0 Comments
EMAIL LIST
Join Our Newsletter
Sign up for sale alerts, special offers, and more!

By clicking the ‘Subscribe’ button you acknowledge reading and accepting our Privacy and Cookies policy.
OTHER ARTICLES
-
 Welcome to the Circulo Summer Trunk Show! Circulo has curated some fun summer garments and accessories in a variety of yarns that we will have in the shop for you to check out! We've shared some of the patterns and yarns that will be highlighted below. The problem we're having is deciding what we want to cast on first! Summer Shawl A good intermediate knitting project, the...
 -
 We are thrilled to showcase the talent of local designer Megan Gonzalez as part of our Local Yarn Store Day celebration! Come see some of these gorgeous designs in person April 15th through May 4th and stop by to say "Hello!" on Saturday, April 27th as Megan joins us for LYS Day! Can't make it in? You can find all of these patterns on...
 -
 Welcome to Stash Dive with MFY where we take a deeper look at the brands we carry and the hearts behind them! About malabrigo Based in Uruguay and Peru, malabrigo is a family-owned business that is passionate about inspiring people through color and quality yarns. They pull from the beauty of the nature around them, places beyond them and the day-to-day life that...


