 Skip to Content
Go to Accessibility Statement
Skip to Content
Go to Accessibility Statement


Star Stitch Tutorial

The star stitch creates a relatively solid, thick fabric with tons of texture. The construction limits the amount of stretch and has clearly identifiable right and wrong sides. While two rows of the four-row repeat are straight knitting, the star stitch itself can be a bit fiddly - especially when first learning it. Easy to remember but requiring patience and practice, this stitch pattern is a bit better suited for more experienced knitters.
Techniques Used
- CO - cast on (we used the long tail method)
- K - knit
- P - purl
- P3tog - purl three stitches together
- YO - yarn over
- BO - bind off (we bound off knitwise)
Instructions for Working Flat
- Cast on a multiple of 4 stitches plus 1 additional stitch.
- Row 1 (right side) - Knit across.
- Row 2 (wrong side) - *P1, [p3tog but don’t slip the stitch, yo purlwise, and p3tog in the same stitch again]*, p1.
- Row 3 - Knit across.
- Row 4 - P3, *[p3tog but don’t slip the stitch, yo, p3tog in the same stitch again], p1*, p2.
- Repeat Rows 1-4 to desired length.
- Bind off.
- Start a new color on Row 3 and go back to the first color on Row 1 for alternating stars.
Comments for Knitting in the Round
It is possible to work the star stitch in the round with small adaptations. You can knit whatever you are creating inside out and simply purl rows 1 and 3 instead of knit. Or...you could change the p3tog’s into k3tog’s and complete the yarn over knitwise.
One last note on knitting this in the round that you may not want to hear. Check your math! When casting on for working flat, you add the additional stitch to have a stitch on either side of each star. You do not need this when working in the round. Also, the idea with rows 2 and 4 is to offset the star stitches by two stitches. Double check that both rounds 2 and 4 work out with your stitch count before you start to avoid frustrated frogging!
Step By Step Guide to the Star Stitch Tutorial
Step 1: Cast on a multiple of 4+1. (We cast on 17 stitches for this example.)

Step 2: Row 1 instructs us to knit across the row.

Step 3: Row 2 starts with a purl stitch.

Step 4: Row 2 continues with a p3tog, but don’t slip the stitch off your left needle!

Step 5: Row 2 continues with a yarn over purlwise which brings the yarn up over the front of the needle and down around the back.

Step 6: Row 2 continues with another p3tog in the same stitches you did the first p3tog. You then slip this off the left needle.
Step 7: To finish Row 2, repeat the p1, [p3tog, yo, p3tog] to the last stitch which is a p1.
![Step 7 of Star Stitch Tutorial: To finish Row 2, repeat the p1, [p3tog, yo, p3tog] to the last stitch which is a p1.](https://cdn.shopify.com/s/files/1/2638/1262/files/Star_Stitch_-_7_480x480.jpg?v=1615419906)
Step 8: Row 3 instructs us to knit across the row again.

Step 9: Row 4 starts with p3 (to offset the star motif).

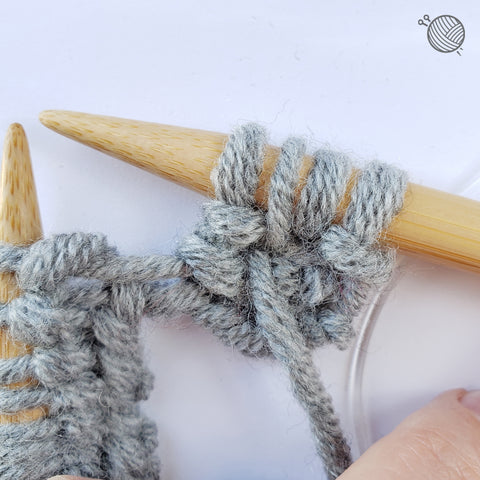
Step 10: Row 4 continues with repeating *[p3tog, yo, p3tog], p1* to the last two stitches which will be p2.
![Step 10 of Star Stitch Tutorial: Row 4 continues with repeating *[p3tog, yo, p3tog], p1* to the last two stitches which will be p2.](https://cdn.shopify.com/s/files/1/2638/1262/files/Star_Stitch_-_10_480x480.jpg?v=1615420052)
Your right side will have the star stitch texture.

Your wrong side will have a garter-ish look.

Tips for the Star Stitch
- Loosen up! It can be easier to knit the star stitch if you work more loosely and/or try using a slightly larger needle than you might normally. (This is your friendly reminder to always check your gauge!)
- Try a different fiber. The star stitch does work well with a variety of fibers, but will have a different look and feel to the overall fabric depending on your choice. Choosing a yarn with more structure and twist - say a plied wool - will lead to a denser, more defined texture. Using a more flexible fiber like alpaca will create a softer fabric with more subtle stars.
- A stitch by any other name. You may also find this stitch referred to as a Daisy Stitch or Flat Knot. There are a few variations, so if this method doesn’t work for you, consider finding an alternative with a similar look!
Star Stitch Pattern Summary

If you’re looking for a pattern to try out this stitch, we shared the Lotus Flower Beanie and it is a lovely way to show off bulky or super bulky yarns. This is also a nice stitch to add as a border detail or contrast stitch on a sweater or booties. Use it for allover texture if you’re feeling extra ambitious!
0 Comments
EMAIL LIST
Join Our Newsletter
Sign up for sale alerts, special offers, and more!

By clicking the ‘Subscribe’ button you acknowledge reading and accepting our Privacy and Cookies policy.
OTHER ARTICLES
-
 MFY+ is our YouTube channel that we consider an extension of our shop where you can find tools, inspiration and - of course - a few shenanigans! Our videos are grouped into playlists on YouTube if you want to watch through videos related to a broader topic or are just starting out and don't know what you don't know! This list is meant...
 -
 It is probably not shocking that the rise of Artificial Intelligence (AI) has created a stir in the technology world - especially in recent years. What may be more surprising, however, is that our very own fiber industry is running into challenges with AI too! Take a moment and think back to how long it took you to create your last project. A weekend...
 -
 Helix or helical stitching creates interlocking spirals of single-row stripes with no perceptible beginning and no jogs between stripes. The helix can be created with two or more colors and requires no twisting to keep the yarns connected and stitches even. Beyond beautiful, seamless stripes, this method of stitching is also a neat and tidy way to alternate skeins of hand-dyed yarn. The...


